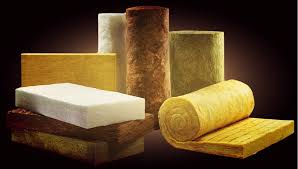
Proper insulation is one of the smartest ways to improve a building’s comfort, energy efficiency, and safety. Rockwool rolls and insulation boards are popular choices because of their excellent thermal resistance, fire safety, sound absorption, and durability. Whether you’re insulating a home, office, or commercial facility, correct installation is key to maximizing these benefits.
This step-by-step guide walks you through the process of installing Rockwool rolls and boards in walls, ceilings, and floors.
- Preparation and Planning
a. Assess the Area
Identify where insulation is required: external walls, internal partitions, lofts, ceilings, or floors.
Measure the dimensions of the spaces to calculate the quantity of Rockwool rolls or boards needed.
b. Gather Tools and Materials
You will need:
Rockwool rolls or boards
Measuring tape and marker
Utility knife or insulation saw
Safety gear: gloves, goggles, dust mask, long sleeves
Fixing tools (staple gun, screws, insulation clips, or wall ties depending on application)
Vapor control layer (if specified in design)
c. Safety First
Rockwool is safe to handle but can produce dust fibers. Always wear protective clothing and ensure proper ventilation during installation.
- Installing Rockwool Rolls (Ideal for Roofs, Ceilings, and Cavity Walls)
Step 1: Measure and Cut
Unroll the Rockwool and measure it against the cavity or joist spacing.
Cut it slightly wider than the gap to ensure a snug fit.
Step 2: Fit Between Joists or Studs
Place the roll gently between ceiling joists or wall studs.
Ensure it fits tightly without leaving gaps but avoid compressing the material, as this reduces its effectiveness.
Step 3: Layer for Extra Thickness
For ceilings or lofts, apply two layers: one between the joists and another laid across them to eliminate thermal bridging.
Step 4: Secure in Place
Use insulation supports, staples, or fixing straps to hold the rolls in position if necessary.
- Installing Rockwool Insulation Boards (Ideal for Walls, Floors, and Facades)
Step 1: Prepare the Surface
Ensure the wall or floor is clean, dry, and free of debris.
Mark out fixing points if using mechanical fasteners.
Step 2: Measure and Cut Boards
Use a sharp insulation saw or knife to cut boards to the exact size required.
Boards should fit tightly together to avoid thermal gaps.
Step 3: Position the Boards
Place boards directly against the surface (external wall, internal partition, or floor).
For external insulation systems, stagger the joints in a brick-like pattern for greater stability.
Step 4: Fix the Boards
Secure with insulation anchors, screws, or wall ties depending on the application.
In floor installations, boards can be laid flat and held in place by the floor covering above.
Step 5: Seal Gaps
Use sealant or insulation tape around edges, joints, and penetrations (e.g., around pipes and cables).
This prevents air leakage and improves thermal performance.
- Additional Steps for Maximum Efficiency
Install a Vapor Control Layer
In some cases, especially in humid regions, adding a vapor barrier or membrane on the warm side of the insulation helps prevent condensation and moisture buildup.
Protect External Insulation
If Rockwool boards are installed externally, cover them with appropriate cladding, rendering, or weatherproof finishing systems to protect against rain and mechanical damage.
Combine with Fire Stops
For high-rise buildings or large commercial spaces, integrate Rockwool fire stops to enhance fire compartmentalization and improves safety.
- Post-Installation Checks
Inspect for Gaps: Ensure there are no spaces between rolls, boards, or edges where heat can escape.
Check Fixings: Confirm that boards or rolls are firmly secured and not sagging.
Test Airtightness: Where possible, perform an airtightness check to confirm reduced air leakage.
Verify Compliance: Make sure installation meets local building codes and insulation standards.
- Maintenance and Long-Term Performance
Once installed, Rockwool insulation requires little maintenance. However:
Inspect occasionally for moisture ingress, especially in roofs and external walls.
Replace any damaged boards if compromised by structural repairs.
Keep ventilation in the building adequate to maintain healthy indoor air quality.
Installing Rockwool rolls and insulation boards is a practical way to boost energy efficiency, improve fire safety, and create quieter, more comfortable indoor environments. By following the right steps—planning, cutting, fitting, and sealing—you can ensure the insulation performs effectively for decades.
For homeowners, this means lower energy bills and enhanced comfort. For contractors and developers, it ensures compliance with building regulations, safety standards, and sustainability goals.
Whether you’re upgrading an existing building or starting a new project, Rockwool insulation remains one of the smartest long-term investments in modern construction.